Comment

Family portrait: Wenatchee siblings

Got to spend a few minutes (a 13 minute photo session anyone?) shooting these siblings this weekend. Met with them and their Dad (all of whom I've shot before), and it was raining. Not a full on pour but definitely more than a drizzle. Dad wanted to go ahead and we were all game so spent a few minutes getting some shots. He normally has an annual portrait taken at the local "mega-studio" (who shall remain nameless, but if you're from Wenatchee, you know who I'm referring to), but was so happy with the family portraits I did for them a year prior that he asked me instead. I'm thrilled to have another repeat client and they commented at the end that they wanted to do the family sessions annually and I would be hearing from them soon. Love that, getting to see, and document, a family grow and change over time. Thanks Smith family!

Comment

Comment

Adrian S.

Adrian, I have been trying to email you concerning your contact through my website but AOL keeps rejecting my messages. Please contact me again and leave your phone number so I can just call you :)

Thanks!

Comment

3 Comments

Sports photo: Wenatchee Volleyball

Shade's team, the WVC Knights, had an intra-squad match tonight. It was my first time in what is now her home gym. Was so happy to see it's pretty well lit, mostly because all the walls are white. Made it possible to get some great shots with the equipment I normally use for portraits. Just had to post this one as I think it is my favorite sports shot I've ever taken. Ever. Shade is No. 4 in that big triple block on the right. I won't be able to go to many of the away games, but am so looking forward to the home ones! I'm sure you'll see a few of those shots end up here, though I'll try not to turn this into a volleyball blog for the next few months.

3 Comments

1 Comment

Before and After: TRA "Dirty Pictures"

Today I got to play with a MUCH awaited new filter/action from Totally Rad Actions (my very favorite action company!) I'm already a big fan of adding texture to photos in post-process and this ingenious little filter makes it so much quicker. As eager as I was to get it, what sold me was the ability to also use your own textures from within the filter, just like the ones that come with it. Very forward thinking of the Boutwells, (the creators), to not limit you to just the provided textures. It was perfect timing as I wanted to post another Before and After.

We got new next door neighbors and they have 2 new puppies! I asked if I could take a few photos in exchange for prints and was welcomed into their backyard on an amazingly golden summer evening. This is Rudy, the pug pup. In this image, I burned in his fur a bit to bring out the detail and added some selective focus to emphasize Rudy. Also added a little more vibrance to bring out the color variation in the grey stone. With this photo, I actually "ended" with the middle image as my final. Then, after buying the Dirty Pictures filter, I reopened it and added the fabulous texture you see here. I liked it before, I love it now. Oh and concerning the texture. I really like adding a couple (or more) of the textures and lowering their opacity so they can really interact and be unique. One of the "textures" I used here is actually a portion of a shot from Yosemite park. I thought it brought back that warm evening color I remember from the night.

1 Comment

Comment

Before and After: candid portrait photography

It's still Wednesday, right? Or how about "it's ONLY Wednesday?" That's more like it, a slow week for sure.

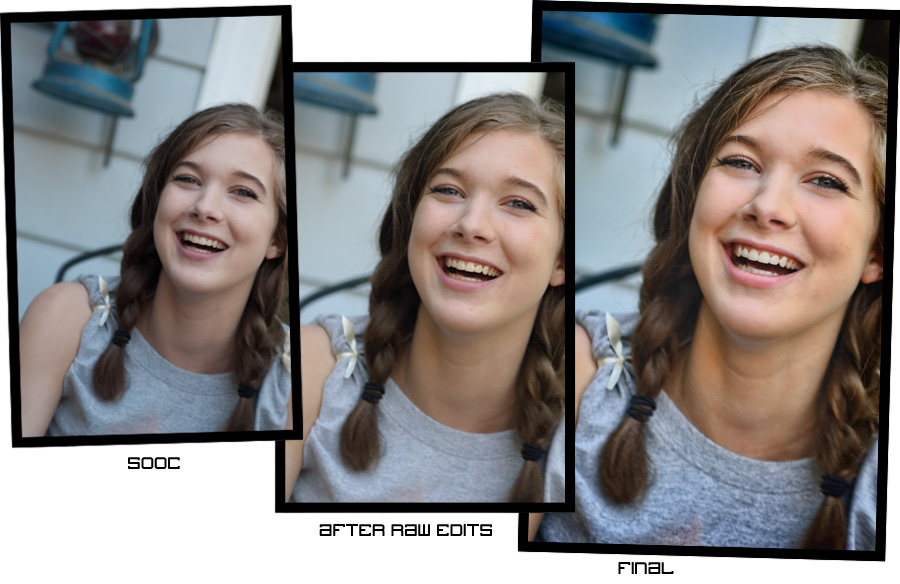
For this before and after you can see the difference in this photo is mostly a little crop and rotate, some warming up and a boost to the contrast and sharpness. I was testing out a new plug-in by Topaz Labs called Detail and it claims to sharpen without halos. A pretty tall order but I think they've done a good job. The thing I have noticed with the Topaz plug-ins is it is really easy to go too far. I try to be selective in how I apply them and even in retrospect seeing my after image, I think it could be a bit softer in the hair, particularly on the top left of her part. I also softened the skin beforehand as one of the downfalls of sharpening is super textured skin, which you generally don't want. I didn't need to do much as her skin is pretty nice. I created a layer that was composed of just the red channel and did a surface blur. Added a bit of noise back in, changed the blending mode to soft light and lowered the opacity to taste. The Detail plug-in really helped her eyes pop, especially since she has the type of (smaller) eyes that close when she laughs or smiles -- which is one of the things that gives her that beautiful smile! I whitened her teeth a bit because few people have really white (movie star white) teeth and the extra warming made it worse. (I could have also masked out the teeth in the warming process, but like everything else in post-processing, there are lots of ways to achieve the same thing).

I hope you find these helpful and if there are ever any requests or questions, please don't hesitate to ask. I try to answer everything that comes my way!


Comment